
INtime SDK Help
Configuration of INtime for Windows Host
INtime is a complex product. There are many parameters to configure which allow a large variety of different solutions using the product. This section describes the configuration process in detail.
The process is different for each product. INtime for Windows and the INtime SDK have a INtime Configuration Panel utility for managing the configuration. INtime Distributed RTOS has a web-based interface to configure the target system.
By default, the Install program configures INtime software to:
%PROGRAMFILES%\INtime directory.The INtime Configuration Panel's Help contains step-by-step instructions for many tasks. You can access this Help by starting the utility, then pressing the Help button located at the bottom of the window.
Configuration of an INtime for Windows System is done with help of the INtime Configuration Panel, a Windows-based utility that is installed with the product.
To enter the INtime Configuration Panel, either:
The following dialog is displayed:
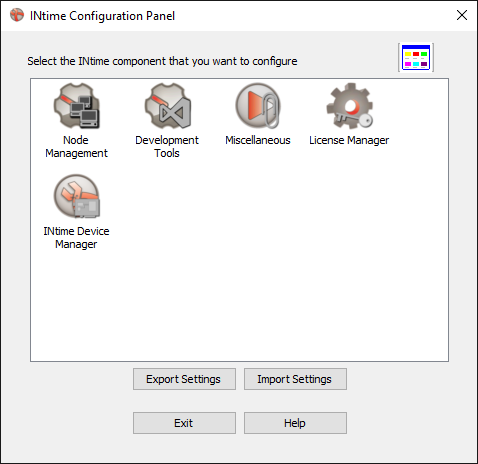
The following applets are available:
| Utility | Function |
| Node Management | Configure local nodes: create and configure local INtime for Windows nodes Configure system settings: Access Distributed RTOS nodes for configuration and file transfer |
| Development Tools | Install INtime components into Visual Studio |
| Miscellaneous | Configure certain system features |
|
License Manager |
Check existing license status, and install new licenses |
| INtime Device Manager | Configure I/O devices to be controlled by INtime instead of Windows |
This applet allows individual local INtime nodes to be configured, and INtime for Windows system parameters to be modified. It also provides access to the configuration interface for INtime Distributed RTOS nodes.
Left-hand pane:
Display of active local and RTOS nodes. Local nodes have a simple node name. RTOS nodes are preceded by the hostname where they reside.
Selecting the local host name allows the configuration of INtime for Windows system parameters.
Selecting an individual local node name allows that node to be configured.
Selecting an RTOS node name provide links to the configuration application on that node. It also allows the setting up of a local FTP client to transfer files to and from the node.
INtime for Windows System parameters
The System tab is displayed when the local host name is selected in the left-hand pane, or when one of the local nodes is selected.
These settings configure the whole Windows platform to set up the environment in which INtime runs.
Windows interaction
The two most important items in this table are as follows:
Boot mode: Since Windows 8, the INtime node is assigned to its own core, or hardware thread. This mode is called "Dedicated mode".
Memory allocation: The default method to allocate memory to the INtime system is to use Windows Non-Paged Pool. If your system does not have enough memory to do this, or you wish to allocate a large amount of memory to INtime on a 32-bit system, change the memory allocation method to "Exclude memory from Windows". This configures the Windows boot-loader to remove memory from the system RAM and not to use it for Windows. This memory is then used by INtime for node memory.
Warning: If you use the "Exclude memory from Windows" setting, and you change the amount of RAM installed in your system, you need to recalibrate the memory removed from Windows by executing the command "inconfig.exe /r" from a command window and rebooting the host. Not doing this can cause the system to fail to boot.
You may also need to do this if you change your video card, or its memory configuration.
Other items in this table are described in detail in the Configuration help file.
The Kernel tab is used to configure kernel settings specific to this node, such as the amount of memory allocated to the node and the system clock rate.
The Network tab is used to configure the network stack for the selected node, including the selection of drivers and IPv4 and IPv6 address selection.
The Auto Load tab is used to configure the automatic startup real-time applications as well as system services such as iWin32 and the SpinDoctor.
The Advanced tab is used to configure all the possible settings for the node software. This should only be used in unusual circumstances on advice from TenAsys support staff. See details about the Advanced Configuration Settings.
The Legacy Network tab is used to configure the legacy networking software. This should only be used if you have applications generated from version of INtime prior to version 4.0, and you need to keep binary compatibility. Newer applications should use the current network implementation.
The Log tab shows the log messages captured from certain parts of the configuration process. In some cases you may be asked to report the contents of this tab by TenAsys support staff.
This applet allows you to install or uninstall support for different versions of Visual Studio. You should only normally need to use this if you installed Visual Studio after you installed the INtime SDK.
Certain settings do not easily fit into other applets. This includes settings such as setting the size and behavior of INtime console windows, and the default behavior of the Fault Manager.
This applet allows you to install and manage your licenses. The license management process is described in a separate document and depends on which version of the product you purchased.
The INtime Device Manager passes control of a plug-and-play device between Windows and a local INtime node. Since Windows gets control when the PC boots, it looks for new hardware and installs associated device drivers as necessary. This may be undesired when a device must be controlled by an INtime process. This utility assigns a device to INtime use by installing a simple device driver on the requested device. The device driver does two things:
See the utility's help file for detailed instructions.