
INtime SDK Help
Installation of INtime Distributed RTOS
Installation of INtime Distributed RTOS is performed using a USB drive.
Sources for the INtime installation package:
The INtime Distributed RTOS target system must be installed on a PC platform capable of booting from USB media with IDE, or SATA, NMVe, eMMC interface and storage media attached. The INtime Distributed RTOS runtime installation software is initially booted from a USB flash drive and installed on the selected boot media.
A keyboard is required for installation; both PS/2 and USB types are supported.
The CPU must include an APIC interrupt controller and the BIOS must advertise the fact. INtime Distributed RTOS does not run using the legacy 8259 PIC.
A supported network controller interface is required for connection to the Windows development system – onboard or on a card. Supported devices are listed at this location:
https://tenasys.com/my-tenasys/knowledge-base/knowledge-base-page/?pageNum=4
INtime can be installed on hosts with up to 64 hardware threads. INtime can be assigned to a maximum of 32 hardware threads. Note that Hyperthreading provides 2 hardware threads for each hardware core when enabled.
Each INtime process can address a maximum of 4GB memory. Multiple processes can be loaded on each INtime instance (thread) enabling access to the entire 64-bit memory address space.
INtime for Windows development environment configuration with the Windows and INtime components running on the same platform.
The INtime Distributed RTOS configuration is designed to support an end product that has an INtime application working on a platform by itself. For this reason the default installation of INtime Distributed RTOS configuration does not include the installation of an INtime Node (INtime RTOS and application) on the same platform as the INtime SDK. The resultant development environment looks as shown in the figure below, with the SDK running on a Windows platform and the INtime user application running on a separate platform, the target platform. The resultant output of that environment is to have an INtime application running stand-alone on a target platform that is running an INtime Node.
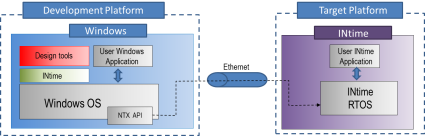
INtime Distributed RTOS development setup running on separate platforms connected by Ethernet.
Note that the INtime for Windows and INtime Distributed RTOS development environments are identical except for the INtime Distributed RTOS having the Windows and the INtime components running on separate platforms connected via Ethernet. Because of those similarities it is possible to develop stand-alone INtime application with an INtime for Windows configuration setup and then move the application to target platform.
The steps below describe the installation process to install INtime Distributed RTOS onto the target system.
The installation process assumes the target system supports booting from USB media.
IMPORTANT: Once the target system installation is complete, the target system will check for the appropriate license credential to run. You must then:
This step prepares a USB drive for installation of the INtime software on a target system. The USB drive will be formatted before installing the installation software. If the partition type of the USB drive is MBR (Master Boot Record) it cannot be used to install INtime Distributed RTOS on hosts with a UEFI only BIOS. Repartition the USB drive to GTP (GUID Parition Table) with the Windows utility: diskpart.
At the prompt, enter the driver letter of your USB drive:
Enter USB Drive letter:
eg, d:
--
Press any key to continue ...
If the USB drive install media is booted with legacy/MBR it will only allow a legacy/MBR installation.
If the USB drive install medis is booted with UEFI/GPT and the prior installation used MBR an option is provided to convert to GPT.
Enter 'n' to not retain the MBR format and use UEFI instead.
Alternatively, when prompted 'Do you want to use the entire device', enter 'n'. This will drop you intro an interactive gpartsh prompt. At gpartsh> enter 'help' and 'gpt'. This will convert your device to GPT format. Then 'exit' to leave gpartsh.
This step prepares the INtime Distributed RTOS USB installer with a specific configuration. It can suppress any user input and show only progress dialogs during installation. No reboots will be initiated automatically. These options allow users to customize their setup during installation effectively.
Customization of the INtime Distributed RTOS installation can be achieved using command-line options, and then a specific installation configuration can be generated to automate the configuration process.
The INtime Distributed RTOS USB installer accepts some command line options for initial configuration. These options allow you to control debugging, verbosity, and file paths for configuration and backups.
|
Option |
Description |
|
-d |
Enable debug mode. In debug, we won’t use the selections of user interaction |
|
-v |
Enable verbose mode. |
|
-f <file path> |
Specify installation configuration file path in install.img. An installation configuration file contains installation configuration parameters. |
|
-b <filename > |
Specify the installation configuration backup file name. This file will be created in the root partition. |
The installer command line options are stored in a text file (rtconfig.ins) on the USB stick. The parameter (INSTALL_ARGS) should be described in the section ([INIT]). Multiple command line options can be used together to customize the installation process. For example:
[INIT]
INSTALL_ARGS = '-v -f answer.txt -b backup.txt'
All configuration parameters for the installation process must be stored in a text file. This text file must then be copied into the install.img file on the USB disk.
The parameters are described in the following section:
|
Parameter |
Default |
Description |
|
keyboard |
-1 |
Choose a keyboard layout for the system.
0: United States 1: Latin America 2: France 3: Germany 4: Italy 5: Spain 6: Sweden/Finland 7: United Kingdom |
|
disk |
"" |
Specify the disk for installation (e.g., "ada0"). |
|
do_partition |
-1 |
Enable or disable repartitioning of the selected device.
0: Skip repartitioning 1: Perform repartitioning |
|
do_gpartsh |
-1 |
Enable entering an interactive gpartsh prompt
0/-1: do repartition according to partition sizes 1: Enter an interactive gpartsh prompt |
|
boot_part_size |
"" |
Define the boot partition size (e.g., 128MB, 4G). Leave undefined to use the default value.
Check Partition Installation Workflow: Size, Naming, and Validation Procedures |
|
root_part_size |
"" |
Define the root partition size (e.g., 128MB, 4G). Leave undefined to use the default value.
Check Partition Installation Workflow: Size, Naming, and Validation Procedures |
|
boot_part_id |
-1 |
Define the boot partition Id. Leave undefined to use the default value.
Check Partition Installation Workflow: Size, Naming, and Validation Procedures |
|
root_part_id |
-1 |
Define the root partition Id. Leave undefined to use the default value.
Check Partition Installation Workflow: Size, Naming, and Validation Procedures |
|
do_format |
-1 |
Enable or disable formatting of partitions.
0: Skip formatting 1: Perform formatting |
|
do_unpack |
-1 |
Enable or disable unpacking of installer files.
0: Skip unpacking 1: Perform unpacking |
|
posix_tz |
"" |
Configure the time zone in POSIX format.
Check Time Zone Table |
|
cmos_local |
-1 |
Adjust time and date manually.
0: Use automatic time setting 1: Set manually and use user input |
|
do_net |
-1 |
Enable network configuration.
0: Skip network configuration 1: Perform network configuration |
|
if0_name |
"" |
Specify the name of the network interface (e.g., "eth0"). |
|
Static IP Configuration |
||
|
if0_addr |
"" |
Static IP address (e.g., "192.168.1.100"). |
|
if0_mask |
"" |
Subnet mask (e.g., "255.255.255.0"). |
|
if0_gw |
"" |
Gateway address (e.g., "192.168.1.1"). |
|
if0_dns |
"" |
DNS address (e.g., "8.8.8.8"). |
|
DHCP Mode |
|
|
|
if0_dhcp |
-1 |
Enable DHCP mode.
0: Use static IP 1: Enable DHCP |
|
host_name |
"" |
Set the system hostname (e.g., " mydrtos"). |
|
domain_name |
"" |
Set the network domain name (e.g., " mydrtos.com"). |
|
admin_pwd |
"" |
Set the administrator password. There is a default password in hypervisor environments. |
|
custom_zip |
"" MAX:64 |
Specify a zip file containing your own files or folders that you wish to include in the installation image. The zip file must be placed at the root of the install.img. Check Customized Files or Folders. |
|
do_silence |
-1 |
Enable silent installation mode.
0: Disable silent mode 1: Enable silent mode |
|
do_reboot |
-1 |
Enable reboot after installation.
0: Disable reboot 1: Enable reboot |
|
Time zone |
POSIX format |
|
(UTC+02:00) Amman |
JST-2JDT,M3.5.4/23:59:59,M10.5.5/1:00:00 |
|
(UTC+02:00) Athens, Bucharest, Istanbul |
GST-2GDT,M3.5.0/3:00:00,M10.5.0/4:00:00 |
|
(UTC+02:00) Beirut |
MES-2MED,M3.5.6/23:59:59,M10.5.6/23:59:59 |
|
(UTC+02:00) Cairo |
EST-2EDT,M4.5.4/23:59:59,M9.5.4/23:59:59 |
|
(UTC+02:00) Damascus |
SST-2SDT,M3.5.4/23:59:59,M10.5.4/23:59:59 |
|
(UTC+02:00) Harare, Pretoria |
SAS-2 |
|
(UTC+02:00) Helsinki, Kyiv, Riga, Sofia, Tallinn, Vilnius |
FST-2FDT,M3.5.0/3:00:00,M10.5.0/4:00:00 |
|
(UTC+02:00) Jerusalem |
JST-2JDT,M4.1.5/2:00:00,M10.1.0/2:00:00 |
|
(UTC+02:00) Minsk |
EES-2EED,M3.5.0/2:00:00,M10.5.0/3:00:00 |
|
(UTC+03:00) Baghdad |
AST-3 |
|
(UTC+03:00) Kuwait, Riyadh |
AST-3 |
|
(UTC+03:00) Moscow, St. Petersburg, Volgograd |
RST-3RDT,M3.5.0/2:00:00,M10.5.0/3:00:00 |
|
(UTC+03:00) Nairobi |
EAS-3 |
|
(UTC+03:30) Tehran |
IST-3:30IDT,M3.3.6/23:59:59,M9.3.1/23:59:59 |
|
(UTC+04:00) Abu Dhabi, Muscat |
AST-4 |
|
(UTC+04:00) Baku |
AST-4ADT,M3.5.0/4:00:00,M10.5.0/5:00:00 |
|
(UTC+04:00) Port Louis |
MST-4 |
|
(UTC+04:00) Tbilisi |
GST-4 |
|
(UTC+04:00) Yerevan |
CST-4CDT,M3.5.0/2:00:00,M10.5.0/3:00:00 |
|
(UTC+04:30) Kabul |
AST-4:30 |
|
(UTC+05:00) Ekaterinburg |
EST-5EDT,M3.5.0/2:00:00,M10.5.0/3:00:00 |
|
(UTC+05:00) Islamabad, Karachi |
PST-5 |
|
(UTC+05:00) Tashkent |
WAS-5 |
|
(UTC+05:30) Chennai, Kolkata, Mumbai, New Delhi |
IST-5:30 |
|
(UTC+05:30) Sri Jayawardenepura |
SLS-5:30 |
|
(UTC+05:45) Kathmandu |
NST-5:45 |
|
(UTC+06:00) Astana |
CAS-6 |
|
(UTC+06:00) Dhaka |
BST-6 |
|
(UTC+06:00) Novosibirsk |
NCA-6NCA,M3.5.0/2:00:00,M10.5.0/3:00:00 |
|
(UTC+06:30) Yangon (Rangoon) |
MST-6:30 |
|
(UTC+07:00) Bangkok, Hanoi, Jakarta |
SAS-7 |
|
(UTC+07:00) Krasnoyarsk |
NAS-7NAD,M3.5.0/2:00:00,M10.5.0/3:00:00 |
|
(UTC+08:00) Beijing, Chongqing, Hong Kong, Urumqi |
CST-8 |
|
(UTC+08:00) Irkutsk |
NAE-8NAE,M3.5.0/2:00:00,M10.5.0/3:00:00 |
|
(UTC+08:00) Kuala Lumpur, Singapore |
MPS-8 |
|
(UTC+08:00) Perth |
WAS-8 |
|
(UTC+08:00) Taipei |
TST-8 |
|
(UTC+08:00) Ulaanbaatar |
UST-8 |
|
(UTC+09:00) Osaka, Sapporo, Tokyo |
TST-9 |
|
(UTC+09:00) Seoul |
KST-9 |
|
(UTC+09:00) Yakutsk |
YST-9YDT,M3.5.0/2:00:00,M10.5.0/3:00:00 |
|
(UTC+09:30) Adelaide |
CAS-9:30CAD,M10.1.0/2:00:00,M4.1.0/3:00:00 |
|
(UTC+09:30) Darwin |
ACS-9:30 |
|
(UTC+01:00) Amsterdam, Berlin, Bern, Rome, Stockholm, Vienna |
WES-1WED,M3.5.0/2:00:00,M10.5.0/3:00:00 |
|
(UTC+01:00) Belgrade, Bratislava, Budapest, Ljubljana, Prague |
CES-1CED,M3.5.0/2:00:00,M10.5.0/3:00:00 |
|
(UTC+01:00) Brussels, Copenhagen, Madrid, Paris |
RST-1RDT,M3.5.0/2:00:00,M10.5.0/3:00:00 |
|
(UTC+01:00) Sarajevo, Skopje, Warsaw, Zagreb |
CES-1CED,M3.5.0/2:00:00,M10.5.0/3:00:00 |
|
(UTC+01:00) West Central Africa |
WCA-1 |
|
(UTC+01:00) Windhoek |
NST-1NDT,M9.1.0/2:00:00,M4.1.0/2:00:00 |
|
(UTC+10:00) Brisbane |
EAS-10 |
|
(UTC+10:00) Canberra, Melbourne, Sydney |
AES-10AED,M10.1.0/2:00:00,M4.1.0/3:00:00 |
|
(UTC+10:00) Guam, Port Moresby |
WPS-10 |
|
(UTC+10:00) Hobart |
TST-10TDT,M10.1.0/2:00:00,M4.1.0/3:00:00 |
|
(UTC+10:00) Vladivostok |
VST-10VDT,M3.5.0/2:00:00,M10.5.0/3:00:00 |
|
(UTC+11:00) Magadan |
MST-11MDT,M3.5.0/2:00:00,M10.5.0/3:00:00 |
|
(UTC+11:00) Solomon Is., New Caledonia |
CPS-11 |
|
(UTC+12:00) Auckland, Wellington |
NZS-12NZD,M9.5.0/2:00:00,M4.1.0/3:00:00 |
|
(UTC+12:00) Coordinated Universal Time+12 |
USS-12 |
|
(UTC+12:00) Fiji |
FST-12FDT,M10.4.0/2:00:00,M3.5.0/3:00:00 |
|
(UTC+12:00) Petropavlovsk-Kamchatsky - Old |
KST-12KDT,M3.5.0/2:00:00,M10.5.0/3:00:00 |
|
(UTC+13:00) Nuku'alofa |
TST-13 |
|
(UTC+00:00) Casablanca |
MST0 |
|
(UTC+00:00) Coordinated Universal Time |
CUT0 |
|
(UTC+00:00) Dublin, Edinburgh, Lisbon, London |
GST0GDT,M3.5.0/1:00:00,M10.5.0/2:00:00 |
|
(UTC+00:00) Monrovia, Reykjavik |
GST0 |
|
(UTC-02:00) Coordinated Universal Time-02 |
USS2 |
|
(UTC-02:00) Mid-Atlantic |
MST2MDT,M3.5.0/2:00:00,M9.5.0/2:00:00 |
|
(UTC-03:00) Brasilia |
ESA3ESA,M10.3.6/23:59:59,M2.3.6/23:59:59 |
|
(UTC-03:00) Buenos Aires |
AST3 |
|
(UTC-03:00) Cayenne, Fortaleza |
SES3 |
|
(UTC-03:00) Greenland |
GST3GDT,M3.5.6/22:00:00,M10.5.6/23:00:00 |
|
(UTC-03:00) Montevideo |
MST3MDT,M10.1.0/2:00:00,M3.2.0/2:00:00 |
|
(UTC-03:30) Newfoundland |
NST3:30NDT,M3.2.0/0:01:00,M11.1.0/0:01:00 |
|
(UTC-04:00) Asuncion |
PST4PDT,M10.1.6/23:59:59,M4.2.6/23:59:59 |
|
(UTC-04:00) Atlantic Time (Canada) |
AST4ADT,M3.2.0/2:00:00,M11.1.0/2:00:00 |
|
(UTC-04:00) Cuiaba |
CBS4CBD,M10.3.6/23:59:59,M2.3.6/23:59:59 |
|
(UTC-04:00) Georgetown, La Paz, Manaus, San Juan |
SWS4 |
|
(UTC-04:00) Santiago |
PSS4PSD,M10.2.6/23:59:59,M3.2.6/23:59:59 |
|
(UTC-04:30) Caracas |
VST4:30 |
|
(UTC-05:00) Bogota, Lima, Quito |
SPS5 |
|
(UTC-05:00) Eastern Time (US & Canada) |
EST5EDT,M3.2.0/2:00:00,M11.1.0/2:00:00 |
|
(UTC-05:00) Indiana (East) |
UES5UED,M3.2.0/2:00:00,M11.1.0/2:00:00 |
|
(UTC-06:00) Central America |
CAS6 |
|
(UTC-06:00) Central Time (US & Canada) |
CST6CDT,M3.2.0/2:00:00,M11.1.0/2:00:00 |
|
(UTC-06:00) Guadalajara, Mexico City, Monterrey |
CST6CDT,M4.1.0/2:00:00,M10.5.0/2:00:00 |
|
(UTC-06:00) Saskatchewan |
CCS6 |
|
(UTC-07:00) Arizona |
UMS7 |
|
(UTC-07:00) Chihuahua, La Paz, Mazatlan |
MST7MDT,M4.1.0/2:00:00,M10.5.0/2:00:00 |
|
(UTC-07:00) Mountain Time (US & Canada) |
MST7MDT,M3.2.0/2:00:00,M11.1.0/2:00:00 |
|
(UTC-08:00) Baja California |
PST8PDT,M4.1.0/2:00:00,M10.5.0/2:00:00 |
|
(UTC-08:00) Pacific Time (US & Canada) |
PST8PDT,M3.2.0/2:00:00,M11.1.0/2:00:00 |
|
(UTC-09:00) Alaska |
AST9ADT,M3.2.0/2:00:00,M11.1.0/2:00:00 |
|
(UTC-01:00) Azores |
AST1ADT,M3.5.0/2:00:00,M10.5.0/3:00:00 |
|
(UTC-01:00) Cape Verde Is. |
CVS1 |
|
(UTC-10:00) Hawaii |
HST10 |
|
(UTC-11:00) Coordinated Universal Time-11 |
USS11 |
|
(UTC-11:00) Samoa |
SST11SDT,M9.5.6/23:59:59,M4.1.6/23:59:59 |
|
(UTC-12:00) International Date Line West |
DST12 |
You can use WinImage or ImDisk to edit and manage the install.img. Check Pack/Unpack Archives: ImDisk.
For the first-time setup, we recommend specifying the backup file path for the installation configuration in rtconfig.ins. You can then use this backup file as your default installation configuration. Remember that the installation configuration file must be copied to install.img.
If you edit the INSTALL_ARGS, reload the rtconfig.ins. You can type:
![]()
If you edit the install.img, reload it. You can type:
![]()
Restart installation, you can type:
![]()
If you encounter any problem that blocks you install INtime, you can type:
![]()
The standard INtime Distributed RTOS has two partitions: boot and root.
We can set up partitions with parameters:
If the partition type of the USB installation media is MBR (Master Boot Record), it will only allow a legacy/MBR installation. On the other hand, if the partition type of the USB installation media is UEFI/GPT (UEFI-compatible GUID Partition Table), it will only allow a GPT installation.
Outcome of partition types:
|
Default type |
Boot partition type |
Root partition type |
|
MBR |
FAT32 |
apple_ufs |
|
UEFI/GPT |
EFI |
freebsd_ufs |
|
Default size |
Boot partition size (boot_part_size) |
Root partition size (root_part_size) |
|
MBR |
4G |
Remaining space after Partition 1 |
|
UEFI/GPT |
128MB |
|
Default name |
Boot partition name (boot_part_name) |
Root partition size (root_part_name) |
|
MBR |
s1 |
s2 |
|
UEFI/GPT |
p1 |
p2 |
Outcome:
Outcome:
Outcome:
Outcome:
Outcome:
Outcome:
Outcome:
Outcome:
Outcome:
Outcome:
In the interactive mode, when prompted 'Do you want to use the entire device', enter 'n'. This will drop you enter an interactive gpartsh prompt. Using the installation configuration file, if do_gpartsh is 1, this will also drop you enter an interactive gpartsh prompt.
Command Line Options
|
Option |
Description |
|
show |
Show partition table |
|
add |
{fat|ufs|efi} [x{M|G}] [n] - Create partition [n] of size x MB or GB |
|
del |
n - Delete partition n |
|
gpt |
Initialize disk as GPT |
|
mbr |
Initialize disk as MBR |
|
sel |
{boot/root} [n] - Select partition [n] |
|
init |
Initialize storage device with default values |
|
verbose |
[on|off] - Set gpartsh verbose command execution |
|
xgpt |
{gpart_args} - Expert mode, invoke gpart directly |
|
help |
Show help |
|
exit |
Quit gpartsh |
Here is a sample c# code for using ImDisk to copy and paste files or folders to the image. Run the code in administrator mode.
Syntax examples:
put file
ImDiskHelper.exe put install.img .\drtos\answers.txt \bin
get file
ImDiskHelper.exe get install.img answers.txt
| ImDiskHelper.cs |
Copy Code
|
|---|---|
using System; using System.Diagnostics; using System.IO; using System.Collections.Generic; class ImDiskHelper { static void Main(string[] args) { if (args.Length < 3) { Console.WriteLine("Usage: ImDiskHelper.exe [put|get] [imagefile.img] [source] [destination] [optional: -d X:]"); Console.WriteLine("Example to put files: ImDiskHelper.exe put imagefile.img C:\\newfiles .\\"); Console.WriteLine("Example to get files: ImDiskHelper.exe get imagefile.img .\\newfiles C:\\backup\\"); Console.WriteLine("Example with custom drive: ImDiskHelper.exe put imagefile.img C:\\newfiles .\\ -d Z:"); return; } // Default drive letter string driveLetter = "X:"; // Parse arguments dynamically Dictionary<string, string> arguments = new Dictionary<string, string>(); for (int i = 0; i < args.Length; i++) { if (args[i] == "-d" && i + 1 < args.Length) { driveLetter = args[i + 1]; i++; // Skip next argument since it's the drive letter } else { arguments.Add(i.ToString(), args[i]); } } // Extract operation, imgFile, source, destination dynamically string operation = arguments.ContainsKey("0") ? arguments["0"].ToLower() : ""; string imgFile = arguments.ContainsKey("1") ? arguments["1"] : ""; string source = arguments.ContainsKey("2") ? arguments["2"] : ""; string destination = arguments.ContainsKey("3") ? arguments["3"] : ""; // Validate arguments if (!File.Exists(imgFile)) { Console.WriteLine($"Error: Image file '{imgFile}' not found."); return; } if (!Directory.Exists(source) && !File.Exists(source)) { Console.WriteLine($"Error: Source '{source}' does not exist."); return; } imgFile = Path.GetFullPath(imgFile); Console.WriteLine($"source: {imgFile}"); // Mount the image if (!MountImage(imgFile, driveLetter)) { Console.WriteLine("Error: Failed to mount image."); return; } // Ensure destination is set properly if (destination == ".") destination = driveLetter + "\\"; else destination = driveLetter + "\\" + destination + "\\"; source = Path.GetFullPath(source); destination = Path.GetFullPath(destination); Console.WriteLine($"source: {source}"); Console.WriteLine($"destination: {destination}"); // Perform the requested operation try { if (operation == "put") { if (Directory.Exists(source)) { string destFolder = Path.Combine(destination, Path.GetFileName(source)); Directory.CreateDirectory(destFolder); CopyDirectory(source, destFolder); } else { string destFile = Path.Combine(destination, Path.GetFileName(source)); File.Copy(source, destFile, true); } } else if (operation == "get") { string sourcePath = Path.Combine(driveLetter, source); if (Directory.Exists(sourcePath)) { string destFolder = Path.Combine(destination, Path.GetFileName(source)); Directory.CreateDirectory(destFolder); CopyDirectory(sourcePath, destFolder); } else if (File.Exists(sourcePath)) { string destFile = Path.Combine(destination, Path.GetFileName(source)); File.Copy(sourcePath, destFile, true); } else { Console.WriteLine("Error: Specified source inside the image does not exist."); } } else { Console.WriteLine("Error: Invalid operation! Use 'put' to add files or 'get' to extract files."); } } catch (Exception ex) { Console.WriteLine($"Error: {ex.Message}"); } // Unmount the image UnmountImage(driveLetter); Console.WriteLine("Operation completed successfully."); } /// <summary> /// Mounts an IMG file using ImDisk. /// </summary> static bool MountImage(string imgFile, string driveLetter) { string command = $"imdisk -a -f \"{imgFile}\" -m {driveLetter} -o rw"; return ExecuteCommand(command); } /// <summary> /// Unmounts the mounted drive. /// </summary> static void UnmountImage(string driveLetter) { string command = $"imdisk -d -m {driveLetter}"; ExecuteCommand(command); } /// <summary> /// Executes a system command. /// </summary> static bool ExecuteCommand(string command) { try { Process process = new Process { StartInfo = new ProcessStartInfo { FileName = "cmd.exe", Arguments = $"/C {command}", RedirectStandardOutput = true, RedirectStandardError = true, UseShellExecute = false, CreateNoWindow = true } }; process.Start(); process.WaitForExit(); string output = process.StandardOutput.ReadToEnd(); string error = process.StandardError.ReadToEnd(); if (!string.IsNullOrEmpty(error)) { Console.WriteLine($"Error: {error}"); return false; } return true; } catch (Exception ex) { Console.WriteLine($"Command execution failed: {ex.Message}"); return false; } } /// <summary> /// Copies an entire directory. /// </summary> static void CopyDirectory(string sourceDir, string destDir) { Directory.CreateDirectory(destDir); // Copy files foreach (var file in Directory.GetFiles(sourceDir)) { string destFile = Path.Combine(destDir, Path.GetFileName(file)); File.Copy(file, destFile, true); } // Copy subdirectories foreach (var subDir in Directory.GetDirectories(sourceDir)) { string destSubDir = Path.Combine(destDir, Path.GetFileName(subDir)); CopyDirectory(subDir, destSubDir); } } } |
|
This section explains how to use the custom_zip parameter to package and include your own files or folders when creating an installation image.
Prepare Your Custom Zip File
1. Gather Your Files or Folders
Decide which files or folders you want to include in your installation image. Please ensure that these files are properly organized and tested for compatibility with your installation environment.
2. Create the Zip File
Create a zip archive. Important: ensure that the zip archive does not contain any additional directory layers that might alter the intended file structure. All files and folders should be placed so that when the zip file is extracted, its contents appear directly in the root directory.
3. Place the Zip File Correctly
Put the zip file is in the appropriate location if your installation process requires it to be at the root of install.img. Rember set the archive as archive file in the img file.
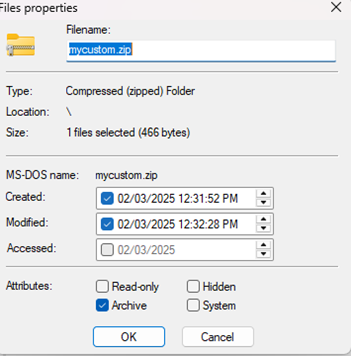
4. Specify the archive file path in custom_zip parameter (e.g. mycustom.zip). Check Installation Configuration Parameters. Be aware that the zip file name needs to be Lowercase and set zip file as archive in the image.
On boot an automatic installation script will be invoked. It will ask a number of configuration questions and at each step you will be prompted to continue. If you choose not to continue, in general the previous step will be repeated.
The INtime SDK comes with a license to run the development tools and local INtime for Windows nodes. All customers under a support agreement have the ability to self serve a Deployment Trial License - 30-day node locked, for use with either INtime for Windows or INtime Distributed RTOS. Note that with the exception of INtime Distributed RTOS before Version 7, runtime licenses can be used for any version of that product. Only INtime SDK licenses are version dependent.
For detailed instructions for obtaining licenses for deployment see the procedures on our website:
https://tenasys.com/run-time-install/
Or:
For INtime Deployment Trial Licenses (for development, testing, or demonstrations):
INtime-Deployment-Trial-License-Procedure
To help you select the most appropriate method for deployment see this guide:
Customer Operations Manager Guide