Installation of the SDK is performed using the CD medium. The installation of the INtime Distributed RTOS component uses a USB drive.
Sources for the INtime installation package:
- INtime SDK CD shipped with an SDK purchase
Use for INtime SDK installation and INtime for Windows Deployment installation.
- Download from TenAsys.com website
- INTIME SDK full_installer.exe (for INtime SDK - Development)
- INtime SDK ISO image (CD)
- INtime Runtime installer.exe (for INtime for Windows Deployment)
- INtime Host only installation.exe (for INtime Windows host only Deployment)
- INtime SDK tools_installer.exe (for INtime SDK tools only without local node)
- Build a USB drive for INtime Distributed RTOS Deployment installation from INtime SDK
Platform Requirements
The development kit should be installed on a Windows PC system, Windows 10 or later including 32-bit and 64-bit platforms, or Windows Server equivalents. A multi-core CPU is required to run INtime for Windows on Windows. Windows must be booted using the Windows bootloader. A dual-boot system where Windows is loaded using a third-party bootloader will not run INtime successfully.
Support for Windows 7 and 8 has been deprecated from INtime version 7 onwards.
INtime can be installed on hosts with up to 64 hardware threads. INtime can be assigned to a maximum of 32 hardware threads. Note that Hyperthreading provides 2 hardware threads for each hardware core when enabled.
Each INtime process can address a maximum of 4GB memory. Multiple processes can be loaded on each INtime instance (thread) enabling access to the entire 64-bit memory address space.
SDK Installation
The INtime SDK supports both INtime for Windows and INtime Distributed RTOS configurations.
In the INtime for Windows configuration, the INtime user’s application runs on the same platform as the development tools while with the INtime Distributed RTOS configuration, the developments tools are run on a separate platform.
The INtime for Windows configuration is designed to support an end product that has an INtime application working in conjunction with an Windows application on the same platform. For this reason installation of INtime for Windows configuration includes the installation of an INtime Node (INtime RTOS and application) on the same platform as the INtime SDK as shown in figure below. The resultant output of that environment is to have both the user’s Windows and the INtime application running on the same platform.
Partitioning of the Windows and INtime environments is described in the Configuration section.
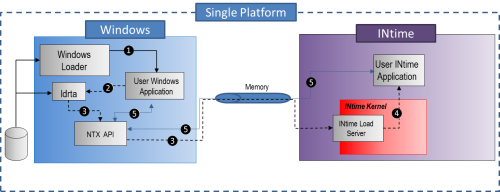
INtime for Windows development environment configuration with the Windows and INtime components running on the same platform.
The INtime Distributed RTOS configuration is designed to support an end product that has an INtime application working on a platform by itself. For this reason the default installation of INtime Distributed RTOS configuration does not include the installation of an INtime Node (INtime RTOS and application) on the same platform as the INtime SDK. The resultant development environment looks as shown in the figure below, with the SDK running on a Windows platform and the INtime user application running on a separate platform, the target platform. The resultant output of that environment is to have an INtime application running stand-alone on a target platform that is running an INtime Node.
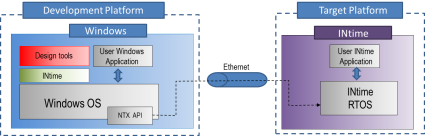
INtime Distributed RTOS development setup running on separate platforms connected by Ethernet.
Note that the INtime for Windows and INtime Distributed RTOS development environments are identical except for the INtime Distributed RTOS having the Windows and the INtime components running on separate platforms connected via Ethernet. Because of those similarities it is possible to develop stand-alone INtime application with an INtime for Windows configuration setup and then move the application to target platform.
SDK and INtime for Windows Installation Procedure
The procedure below describes installation of the INtime development tools and kernel on your development machine. Make sure that your development machine meets the requirements listed in the Platform Requirements section above.
Note: Install Visual Studio and run it at least once before installing INtime and insure that you are logged on with Administrator privileges. If you install Visual Studio after installing INtime, use the INtime Configuration Manager to add the INtime development tools to Visual Studio.
There are two installation sources. One is a self-extracting zip file. The other is a CD-ROM (also available as a downloaded ISO image).
For self-extracting zip file: Download and execute the zip file. The filename has the form: intimexx-yyyyy-zfull_installer.exe where xx is the major version, yyyyy is the build number, and z is the revision. For development tools only, the self-extracting zip file: intimexx-yyyyy-ztools_installer.exe. For runtime only, two other self-extracting zip files are available: runtimexx-yyyyy-z_installer.exe for INtime for Windows without the SDK, and hostxx-yyyyy-z_installer.exe for host only (Windows host utilities to use on a system with only remote INtime nodes),
For CD-ROM: Insert the INtime CD-ROM. If AutoRun is enabled a welcome dialog appears. If AutoRun has been disabled you can start the installation procedure by double-clicking the file named launch.exe in the root directory of the INtime CD-ROM. If using the ISO image, the filename has the form INtimeSDK_CDROM-yyyyy-z.iso where yyyyy is the build number and z is the revision.
The installation procedure is similar to that of most standard Windows applications. You will be asked to accept the INtime software license agreement and to supply one or more registration keys to complete the installation procedure.
A default destination folder of %PROGRAMFILES%\INtime (typically C:\Program Files\INtime) is suggested by the installation program for INtime RTOS and INtime development tools. Make note of this directory so you can locate it again if you wish to inspect header files and other INtime system files. Sample projects will be installed in the user directory of the user who installed INtime. Configuration files will be installed in the %INTIMECFG% directory.
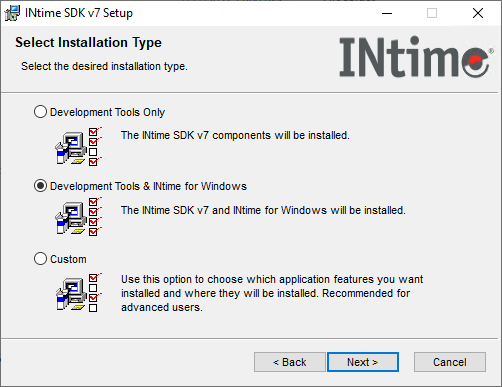
Two basic install options for the INtime SDK are provided:
- Development Tools Only
This option will only install the SDK and no INtime for Windows runtime software. Use this option for setting up a development system for use with an INtime Distributed RTOS target only. The INtime Distributed RTOS components are installed.
An alternative for Develpment Tools Only is to use the tools_installer.exe which should be used to update a development tools only installation.
- Development Tools & Local nodes.
This option installs the SDK and the components required to configure and run local INtime for Windows nodes. Use this option for developing applications for INtime for Windows. The INtime Distributed RTOS components are also installed with this option.
If you are installing a network licensed product you will be prompted to enter the IP address or fully-qualified domain name of the license server. Contact your company’s IT personnel for the license server information you will need to complete this licensing step.
After installation has completed you will be asked to reboot the system. If you have been provided a hardware key, insert it before rebooting. Once the system has rebooted you have the option of configuring the INtime runtime environment and services.
Licensing the SDK
Development Licenses:
-
INtime SDK Evaluation License
-
Time-limited and node-locked license for INtime SDK evaluations. Tied to a major release version.
-
INtime SDK USB/CID License
-
USB/CID (dongle) based license for INtime SDK. Tied to a major release version.
-
INtime SDK Network License
-
Network Server based license for a minimum of 6 SDK seats. The server uses a USB/CID key. Tied to a major release version.
-
INtime Deployment Trial License
-
Time-limited and node-locked self-serve licenses for either INtime for Windows and INtime Distributed RTOS for development purposes. These are Multi-core licenses that work on any version (except pre 7 INtime Distributed RTOS).
Licensing the deployment target
A License String is required for both node-locked licenses and for USB/CID licenses. For USB/CID licenses, the License String is unique for each USB/CID key.
A License String on each SDK host is NOT used for network licenses.
The INtime SDK comes with a license to run the development tools and local INtime for Windows nodes. All customers under a support agreement have the ability to self serve a Deployment Trial License - 30-day node locked, for use with either INtime for Windows or INtime Distributed RTOS. Note that with the exception of INtime Distributed RTOS before Version 7, runtime licenses can be used for any version of that product. Only INtime SDK licenses are version dependent.
INtime Deployment Trial licenses are available self serve from the My Account page. The process includes submitting a Fingerprint (from the License Manager) and installing the resulting license.
Step by step instructions are available on the Policies page.
Details of the INtime installer
Overview of the INtime installer
The INtime installer provided to you has been packaged as a self-extracting zip (SFX). It has been designed to automate the installation of INtime on a Windows system. Prior to INtime’s installation, any missing pre-requisite packages will be added to the system. The installer has been designed to resume after any necessary reboot, when the user who started the installation logs back into Windows.
If the user declines a reboot request, the installation will not resume automatically at the next startup.
If INtime is already installed on the computer, it will offer to upgrade the installation to the new version.
This process is outlined in detail later in this document.
Components of the installer
The INtime installer package is provided as a single file named [type][version]_installer.exe. For example, the installer for INtime SDK version 7.0.12345.1 is named intime70-12345-1-full_installer.exe.
The installer SFX includes both 32-bit and 64-bit versions of the pre-requisite installers, as well as packages for both Windows architectures. In addition to these packages, helper applications are included to allow an older version of INtime to be upgraded to the current release in a manner that preserves the configuration of the INtime installation.
The components of the SFX will be extracted to a new subdirectory under the user’s %USERPROFILE% directory. Once INtime has been completely installed, the user may choose to remove the directory and its components, they will not be removed automatically and will be over-written by subsequent INtime installations.
The files included in the installer are:
- INtime[Version][_x64].exe – The INtime package itself. There are six files in total that comprise the INtime package: an exe file, an ini file, and the msi package, for both 32-bit and 64- bit Windows targets. These packages have been digitally signed by TenAsys at the time of generation. The executable will prompt the user to elevate to Administrator with User Account Control (UAC) enabled. Any command line options passed to the executable will be processed by the Windows Installer service.
- Launcher.exe – The launcher executable is responsible for detecting which architecture of Windows the system is using. Once detected, it will start the applicable launch executable.
- Launch[_x64].exe – The launch executable checks for missing pre-requisites and installs them prior to starting the INtime installer. It is provided for both 32-bit and 64-bit Windows targets. It has been designed to run with as little user interaction as necessary. Pre-requisite installers will display progress bars, but not prompt the user for input. If a reboot is necessary, the launch program will prompt the user to initiate the reboot. If an error is detected when attempting to install any of the missing pre-requisites, the launch program will prompt the user to abort or try again. When a reboot is required, the launch application will add itself to the users Run key in the registry to start back up again after the user has rebooted and logs-in again.
- dotnetfx[x64]_2.0.exe – Some components of INtime require the .NET framework version 2.0 or later to function. The launch application will install the .NET 2.0 framework if a compatible version is not found on the system. It is also provided for both architectures.
- VS2008sp1_vcredist_x[86/64].exe – Windows applications included with the INtime package have been developed with Visual Studio 2008. In order for them to run on the Windows target system, the dlls must be added to the Windows Side-by-Side store. If this package is not detected it will be installed on the system. Please note that this package will also be added even if the dlls exist from a different source (for example: if Visual Studio 2008 is installed on the system, the dlls exist, but this package will still be added). This protects INtime in the event the original source of the dlls is uninstalled.
- Windows hotfix KB942288 – The INtime package requires the Windows Installer service 4.5 or later. This version was released with Windows Vista – Service Pack 2, and therefore must be added to older versions of Windows before INtime can be installed. This hotfix will require a reboot before the launch application can continue. This hotfix is available for Windows XP, Server 2003, Vista, and Server 2008 in both 32-bit and 64-bit architectures. It is not required for Windows 7 or Server 2008 R2
- SentinelSystemDriverInstaller752.exe – For INtime installations that may require a USB key for electronic licensing, the driver will be installed. For installations that do not require a key, this file will not be included in the SFX.
- INtiConW.exe – The INtime configuration application is included in the SFX in order to export and import configurations when an upgrade is performed.
- upgrade.exe – The INtime Upgrade helper program is included in the SFX to backup certain configuration and settings not included in the icf file created by inticonw.exe. These include The Windows VEther device settings (MAC address, IP configuration etc.), device configuration for devices passed to INtime, local and remote node configurations, the license file or server name, and network configuration files.
- devconfig[64].exe – The INtime device configuration tool is included to update the information for any devices that have been passed to INtime. This is required because older versions of INtime did not use the same scheme to identify devices passed to INtime.
- ntx[ext][64].dll – The ntx dlls are included locally so that the INtime configuration and Device configuration tools can execute without the INtime\bin in the PATH variable.
- runmsi.exe – Some systems require special elevation to properly remove the old version of INtime. This tool simply prompts the user to elevate to Administrator permissions to accomplish the removal.
- install[64].exe – Driver installation tools used to remove the RTIF driver in the event a configuration issue of the old version would cause the driver to not be removed.
Using command line options with the INtime installer
The INtime installer was designed to allow the same customizations from the command line as available in past INtime releases.
The installer has two options to control its behavior. These commands are not passed onto the INtime package itself. (NOTE: These command line options are case sensitive and must be all lowercase)
- /silent – This command line option to the INtime installer will prevent any user interaction with the installation process. No reboots will be initiated automatically. The calling process should check the return code and handle a reboot manually if
ERROR_SUCCESS_REBOOT_REQUIRED is returned.
- /forcereboots – This command line option can only be used with the /silent option. It will change the behavior of the installation sequence so that a reboot is initiated immediately after the any package has been installed or upgraded.
- /skipusbdriver – This option will skip the installation of the SafeNet Hardware Key driver software.
- /nouacchange - If the /silent option is specified, the default behavior is to temporarily disable UAC during installation. This is to prevent user prompts to proceed while some of the prerequisites are installed so that the installation may be unattended. A potential side-effect of this behavior is that the UAC level is not restored after the installer is complete until manually acknowledged, or after a reboot. If this behavior is undesirable, specify /nouacchange on the command line to prevent the UAC change during installation.
Other commands specified on the command line will be passed onto the INtime package installer. These options include the standard options available to any MSI package, as well as other options provided by TenAsys to customize the INtime installation: (please note the behavior is different for an upgrade installation, detailed below)
- INSTALLTARGETONLY=1 – Setting this property to 1 will override the default configuration of the “Select Installation Type” dialog page to “Local Target Only” when used with the SDK installers.
- SKIPVETHERINSTALL=1 – Setting this property to 1 will skip the installation of the Windows VEther driver. During an upgrade installation, if the Windows VEther driver was not installed in the old version, it will not be installed in the new version unless you set this property to 1.
- SKIPVSINSTALL=0 – By default the SDK installer does not automatically install all support for Visual Studio versions and the user is prompted to install the support in the final dialog. For automatic installations setting this property to 0 causes all available support to be installed for installed Visual Studio versions. Note this action may fail if certain required packages are missing for Visual Studio versions 2017 and later. If support is not installed then the support may be manually installed afterwards using the Development Tools tab of the INtime Configuration utility.
- INSTALLLEVEL=1000 – When running the INtime installation package silently, it will default to only install development components (for example, visual studio support, INscope, Spider Debugger, etc.) If you wish to have local INtime kernels, you must set the INSTALLLEVEL property to 1000. During an upgrade installation this is the default.
Detailed description of the Upgrade Process
The upgrade process uses MSI (Microsoft Installer). The time estimates can be very optimistic. If the current user's Documents directory is included in OneDrive (or other backup system), this might extend the upgrade time. If possible, mark the %USERPROFILE%Documents\INtime directory as "Always keep on this device" or its equivalent. The progress of the installation can be monitored by viewing the log files: INtime_Upgrade.log and Remove_old_INtime.log in the %USERPROFILE%AppData\Local\INtime_Installer directory.
The automated upgrade process allows an older version of INtime to be replaced with the current version. The following process takes place from the SFX during this process.
When executed, the SFX extracts its contents to a new directory under the current users profile directory (for example: C:\Users\<user>\AppData\Local\INtime_installer\). Any command line options passed to the SFX will be passed to the launcher.exe program once the extraction is complete.
Once extraction is complete, the SFX launches the launcher.exe application. It chooses which architecture it is running on and calls the corresponding launch.exe program to start. It calls that launch.exe application with the same command line options it was passed.
The launch application is started and parses the command line options. If any of the options are detected that apply to the behavior of the launch process itself, it removes those options and saves the rest to a registry value named “INtimeSetup” located under the HKCU\SOFTWARE\TenAsys\INtime\ key.
It then checks the Windows installer service if the pre-requisites have been installed and if INtime is already installed. If the Windows installer service detects that INtime is already installed on the system, it will check the ProductVersion value located under the HKLM\SOFTWARE\TenAsys\ INtime\Version registry key. If the string does not match the version of the version attempting to be installed, it will offer an upgrade to the user, or proceed with an upgrade if called silently. If the strings match, the launch application will alert the user that this version is already installed and exit; it will exit silently when started in silent mode.
Once any missing pre-requisites are added to the system, it will proceed with a series of steps to backup the current configuration.
- Signal the INtime Status monitor to close
- Stop all local INtime Kernels by running the command 'nodemgr.exe “stop –all”'
- Export the current configuration by calling the local copy of INtiConW.exe with the following command line option where “CurrentWorkingDirectory” is the full path to the location launch.exe was executed from (this is the location the SFX was extracted to when using the SFX to perform an upgrade):
- INtiConW.exe /e:“[CurrentWorkingDirectory]\upgrade.icf”
- Export additional configuration not contained in an icf file by running “upgrade.exe /b”. The upgrade helper program will also detect if a configuration issue would cause the RTIF driver to left in the installed state by the uninstall process. In that case, it will cause the driver to be uninstalled.
- The existing installation is removed from the system by running
“msiexec /x {E713FEDC-4C78-4BDE-8E91-77D9B7C23C50} /qb /l*vx Remove_old_INtime.log DONOTPASSTOWIN=1 /norestart REBOOTPROMPT=Suppress”
- /x {E713FEDC-4C78-4BDE-8E91-77D9B7C23C50} Tells the Windows Installer service to remove the INtime package. This package GUID is used for all versions of INtime
- “/l*vx Remove_old_INtime.log” will create a log of the removal under the current working directory
- /norestart REBOOTPROMPT=“Suppress” causes the INtime removal to not restart when
completed.
- If the removal was successful, a registry value named “INtimeUpgrade” is created under the “HKCU\SOFTWARE\TenAsys\INtime” key.
- The upgrade helper application is called again to test for a configuration issue where an INtime device may cause a Windows device to not startup after the reboot.
- The user is prompted to restart the system; in silent mode, a restart is executed with no prompt.
- After the reboot, the launch application will check if the “INtimeUpgrade” key exists. If so, it will continue with the upgrade process
- The new version of INtime will be installed with the command line options originally specified, along with the following additions:
- INSTALLDIR=[OldVersionInstallationPath] This will install the new version under the same directory as the old version.
- SKIPVETHERINSTALL=1 Only if the above conditions were met
- INSTALLLEVEL=1000 For runtime4XX.exe installations, or intime4XX.exe installation where “Development Tools” were displayed in the INtime configuration panel (see note below for additional details).
- /qb show only progress bars while installing
- /norestart REBOOTPROMPT=“Suppress” signals the installer not to restart when installation is complete, and do not prompt the user to restart
- /l*vx INtime_Upgrade.log Create a log file of the new installation
- If the new installation was successful, the log file is copied to the root of the INtime installation directory.
- Import the settings saved from the upgrade backup command by running “upgrade.exe /r”
- Import the upgrade.icf file created before removal by running the local copy of INtiConW.exe with the command
'INtiConW.exe /i:“[CurrentWorkingDirectory]\upgrade.icf”'
- Update any INtime device settings to the latest version of INtime by running the applicable devconfig.exe tools with the following command “devconfig.exe /upci”
- All backup information is removed from the registry and disk. The registry values used by launch are removed as well.
- The user is prompted to reboot the system; during a silent installation the process will exit, or a reboot will be automatically started if /forcereboots was passed to the SFX at the start of the process.
An important note about the upgrade process: When upgrading an SDK installation with the automated upgrade process, it will check if the “Development Tools” INtime configuration panel applet is configured to be shown by checking the “HKLM\SOFTWARE\TenAsys\INtime\ConfigurationPanels\” registry key for the presence of the “Development Tools” value. If this value exists, a full installation of the new version will be performed, if it is missing a Local Target Only installation will be performed. If you originally selected a “Custom” installation and chose the installed features manually, the new installation will not match your original feature set.
Detailed information regarding the INtime Installation Upgrade Helper
- During the Backup operation “upgrade.exe /b”
- First it copies the data for the devices passed to INtime
- To: HKCU\SOFTWARE\TenAsys\INtime\Upgrade\rtdrm\
- Next it copies all the node information
- To: HKCU\SOFTWARE\TenAsys\INtime\Upgrade\Individuals
- It checks if there is an LSHOST variable configured on the system, if so it copies the value
- To: HKCU\SOFTWARE\TenAsys\INtime\Upgrade\Environment\
- If the Windows VEther driver is installed it copies the Windows network configuration
- To: HKCU\SOFTWARE\TenAsys\INtime\Upgrade\VEther
- If the VEther Windows driver is not detected, SKIPVETHERINSTALL=1 will be added to the command line options unless “SKIPVETHERINSTALL=[SomeValue]” is detected in the saved command line options. This allows the VEther driver to be added during an upgrade if desired.
- The path that INtime is currently installed is detected and added to the command line options in the form “INSTALLDIR=[ExistingInstallPath]”
- If “INSTALLDIR=[SomeValue]” is detected in the command line options originally specified on the command line, a warning will be displayed. The path cannot be changed in an upgrade installation.
- The network configuration files, and license file are copied
- To: C:\Users\[username]\AppData\Local\TenAsys\INtime\Upgrade\
- The data saved in the Upgrade key and folder is copied back to its original location during the restore operation “upgrade.exe /r"
See Also