Installation of INtime Distributed RTOS is performed using a USB drive.
Sources for the INtime installation package:
- INtime SDK CD shipped with an SDK purchase
Use for INtime SDK installation or INtime for Windows Deployment installation.
- Download from TenAsys.com website
- INTIME SDK full_installer.exe (for INtime SDK - Development)
- INtime SDK ISO image (CD)
- INtime Runtime installer.exe (for INtime for Windows Deployment)
- INtime Host only installation.exe (for INtime Windows host only Deployment)
- INtime SDK tools_installer.exe (for INtime SDK tools only without local node)
- Build a USB drive for INtime Distributed RTOS Deployment installation from INtime SDK
Platform Requirements
The INtime Distributed RTOS target system must be installed on a PC platform capable of booting from USB media with IDE, or SATA, NMVe, eMMC interface and storage media attached. The INtime Distributed RTOS runtime installation software is initially booted from a USB flash drive and installed on the selected boot media.
A keyboard is required for installation; both PS/2 and USB types are supported.
The CPU must include an APIC interrupt controller and the BIOS must advertise the fact. INtime Distributed RTOS does not run using the legacy 8259 PIC.
A supported network controller interface is required for connection to the Windows development system – onboard or on a card. Supported devices are listed at this location:
https://tenasys.com/my-tenasys/knowledge-base/knowledge-base-page/?pageNum=4
INtime can be installed on hosts with up to 64 hardware threads. INtime can be assigned to a maximum of 32 hardware threads. Note that Hyperthreading provides 2 hardware threads for each hardware core when enabled. Each INtime process can address a maximum of 4GB memory.
Multiple processes can be loaded on each INtime instance (thread) enabling access to the entire 64-bit memory address space.
INtime for Windows development environment configuration with the Windows and INtime components running on the same platform.
The INtime Distributed RTOS configuration is designed to support an end product that has an INtime application working on a platform by itself. For this reason the default installation of INtime Distributed RTOS configuration does not include the installation of an INtime Node (INtime RTOS and application) on the same platform as the INtime SDK. The resultant development environment looks as shown in the figure below, with the SDK running on a Windows platform and the INtime user application running on a separate platform, the target platform. The resultant output of that environment is to have an INtime application running stand-alone on a target platform that is running an INtime Node.
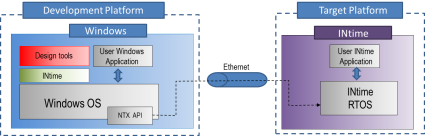
INtime Distributed RTOS development setup running on separate platforms connected by Ethernet.
Note that the INtime for Windows and INtime Distributed RTOS development environments are identical except for the INtime Distributed RTOS having the Windows and the INtime components running on separate platforms connected via Ethernet. Because of those similarities it is possible to develop stand-alone INtime application with an INtime for Windows configuration setup and then move the application to target platform.
INtime Distributed RTOS target installation
The steps below describe the installation process to install INtime Distributed RTOS onto the target system.
The installation process assumes the target system supports booting from USB media.
IMPORTANT: Once the target system installation is complete, the target system will check for the appropriate license credential to run. You must then:
- For development: Use an INtime Deployment Host Trial License (30-day node-locked) or an INtime Deployment Host node locked or a USB/CID (red key) license. The Trial license can be obtained from the My Account page of the TenAsys.com website.
- For deployment: load and activate an appropriate node locked or USB/CID license on the deployment host.
Preparing a USB drive for installation
This step prepares a USB drive for installation of the INtime software on a target system. The USB drive will be formatted before installing the installation software. If the partition type of the USB drive is MBR (Master Boot Record) it cannot be used to install INtime Distributed RTOS on hosts with a UEFI only BIOS. Repartition the USB drive to GTP (GUID Partition Table) with the Windows utility: diskpart.
- Insert the USB drive into the system where the SDK is installed. Use Windows Explorer to determine which drive letter has been assigned to the device.
- Navigate to the "%INTIME%rtos" folder and start the create_installstick.bat command file. This command is also found as "Create an INtime Distributed RTOS USB installer" in the INtime start menu.
At the prompt, enter the driver letter of your USB drive:
Enter USB Drive letter:
eg, d:
--
- Enter the drive letter and press Enter. The drive will be formatted and the files copied to it. At the end you will see the prompt:
Press any key to continue ...
- Press Enter and remove the drive from the system
- Prepare the target system to boot from a USB device, insert the device and boot the system.
If the USB drive install media is booted with legacy/MBR it will only allow a legacy/MBR installation.
If the USB drive install medis is booted with UEFI/GPT and the prior installation used MBR an option is provided to convert to GPT.
Enter 'n' to not retain the MBR format and use UEFI instead.
Alternatively, when prompted 'Do you want to use the entire device', enter 'n'. This will drop you into an interactive gpartsh prompt. At gpartsh> enter 'help' and 'gpt'. This will convert your device to GPT format. Then 'exit' to leave gpartsh.
Installation of the INtime Distributed RTOS target system
Note: the licensing software in the INtime Distributed RTOS will cause the kernel to stop operating after 10 minutes if a valid license is not installed.
The initial system which boots for installation will require you to complete the initial installation within this time, so it is recommended to have your responses prepared in advance.
On boot an automatic installation script will be invoked. It will ask a number of configuration questions and at each step you will be prompted to continue. If you choose not to continue, in general the previous step will be repeated.
- Keyboard selection
Select a keyboard type from the menu by entering its number and pressing Enter.
- Disk selection
A list of disk devices is displayed with their drive names. Select the drive you wish to install INtime software on.
- Partitioning the disk
Note: The following installation instructions assume you have an empty hard disk on which you will be installing the INtime RTOS. If your disk is already partitioned, you will have to either delete your existing partition in step 4 before you create a new partition or you will have to create a second partition and activate that partition for booting.
A bootable partition must be created on the disk.
- From the initial menu, select option 2 to modify the partition table and then option 2 to create a partition.
- Type 1 to create partition 1. Choose option 2 to create a FAT32 partition.
- Enter the partition limits. Enter cylinder 0 for the start of the partition, then reading the information above the menu, select an ending cylinder number to create a partition of at least 100 Mbytes.
- Press Enter to return to the original menu
- Select option 3 to activate (make bootable) your partition and select your partition number (number 1 in the above example)
- Press Enter once more to return to the initial menu then Enter again to exit the utility, following the prompts to save your new partition table.
- Format the partition
Type 'y' to start the format utility then type 'yes' to start the format operation.
- Install the files
Type 'y' to unpack the INtime software files into your partition.
- Set the default time zone
Follow the prompts to select your time zone if the default does not apply.
- Set time and date
This step allows you to adjust the PC real-time clock (battery clock) depending on whether you wish the time to be kept in UTC or your local time zone. Most PCs keep their clock in local time, but you may choose to adjust this so that the battery clock keeps time in UTC (Universal Coordinated Time, or GMT).
- Network configuration
You will be given a list of interfaces detected by the installer. Choose the interface you wish to be the default system interface, which will be used to connect to your development system.
- DHCP – enter ‘y’ if you wish your network address to be assigned by your local DHCP server
- IP Address (if DHCP not selected). Enter an IPv4 address appropriate for your local network
- Netmask. Enter an appropriate netmask for your local network. Pressing ENTER will accept the suggested value, or you can enter a new value.
- Gateway. May be left blank, otherwise the address of the forwarding gateway for your local subnet.
- Type hostname; note the hostname should be a unique name that is recognizable among the devices on your network. Host name may contain only the ASCII letters 'a' through 'z' (in a case insensitive manner), the digits '0' through '9', and the characters ('-',’_’)
- Type Domain Name; may be left blank, or choose your local internet domain name, for example mydomain.com. Domain Name has the same character restrictions as hostname and use the '.' character to separate subdomain names.
- Type the domain name and DNS server. May be left blank, or give the name of your local domain and the IP address of a DNS server.
- Set the Administrator password
This password is used to gain access to the web-based configuration utility on the target and the INshell commands. A password is required. You will be prompted to reenter it for confirmation purposes.
- Reboot the system
Remove the installation media and allow the system to reboot.
- When the system reboots, enter the license within 10 minutes. The 10 minute limit will apply unless a valid license is found.
The license can be entered in one of several ways:
- In the Web interface using the "Activate manually: install license file." option in the License tab.
- In INshell, either in the Web interface, INshell tab, or on the DRTOS console:
- FTP the license.lic file (default name) into the root directory of the DRTOS system.
- Then using the INshell command: "license add".
- Using FTP to install the License String in a file named "lservrc" in the root directory of the DRTOS system.
Licensing the deployment target
A License String is required for both node-locked licenses and for USB/CID licenses. For USB/CID licenses, the License String is unique for each USB/CID key.
The INtime SDK comes with a license to run the development tools and local INtime for Windows nodes. All customers under a support agreement have the ability to self serve a Deployment Trial License - 30-day node locked, for use with either INtime for Windows or INtime Distributed RTOS. Note that with the exception of INtime Distributed RTOS before Version 7, runtime licenses can be used for any version of that product. Only INtime SDK licenses are version dependent.
For detailed instructions for obtaining licenses for deployment see the procedures on our website:
https://tenasys.com/run-time-install/
Or:
https://tenasys.com/policies/
For INtime Deployment Trial Licenses (for development, testing, or demonstrations):
INtime-Deployment-Trial-License-Procedure
To help you select the most appropriate method for deployment see this guide:
Customer Operations Manager Guide
See Also