
INtime SDK Help
Installation
Installation of the SDK and of the INtime Distributed RTOS is performed using the same CD medium. There is also an alternate installation of the INtime Distributed RTOS component using a USB drive.
The development kit should be installed on a Windows PC system, version Windows 7 or later versions of Windows including Windows 7, 8 and 10, 32- and 64-bit platforms, and Windows Server equivalents. A multi-core CPU is recommended for an INtime for Windows installation. A multi-core CPU is required to run INtime for Windows on Windows 8, or on any 64-bit version of Windows. Windows must be booted using the WIndows bootloader. A dual-boot system where Windows is loaded using a third-party bootloader will not run INtime successfully.
Support for Windows XP and Vista has been deprecated from INtime version 6.4 onwards.
If using WIndows 10 version 1703 or later, Secure Boot must be disabled. The requirements of Secure Boot are not Compatible with the requirements for INtime for Windows.
The INtime Distributed RTOS target system must be installed on a PC platform capable of booting from CD drive or USB media, with IDE or SATA interface and a drive attached to that controller. A keyboard is required for installation; both PS/2 and USB types are supported. The CPU must include an APIC interrupt controller and the BIOS must advertise the fact. INtime Distributed RTOS does not run using the legacy 8259 PIC.
A supported network card is required for connection to the Windows development system. Supported cards are listed at this location:
http://www.tenasys.com/index.php/support-home/knowledge-base?page=4
The INtime SDK supports both INtime for Windows and INtime Distributed RTOS configurations.
In the INtime for Windows configuration, the INtime user’s application runs on the same platform as the development tools while with the INtime Distributed RTOS configuration, the developments tools are run on a separate platform.
The INtime for Windows configuration is designed to support an end product that has an INtime application working in conjunction with an Windows application on the same platform. For this reason installation of INtime for Windows configuration includes the installation of an INtime Node (INtime RTOS and application) on the same platform as the INtime SDK as shown in figure below. The resultant output of that environment is to have both the user’s Windows and the INtime application running on the same platform.
Partitioning of the Windows and INtime environments is described in the Configuration section.
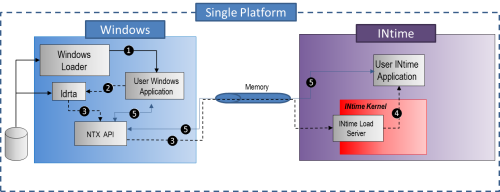
INtime for Windows development environment configuration with the Windows and INtime components running on the same platform.
The INtime Distributed RTOS configuration is designed to support an end product that has an INtime application working on a platform by itself. For this reason the default installation of INtime Distributed RTOS configuration does not include the installation of an INtime Node (INtime RTOS and application) on the same platform as the INtime SDK. The resultant development environment looks as shown in the figure below, with the SDK running on a Windows platform and the INtime user application running on a separate platform, the target platform. The resultant output of that environment is to have an INtime application running stand-alone on a target platform that is running an INtime Node.
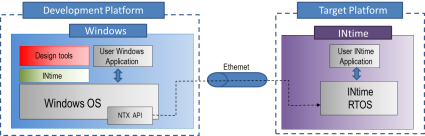
INtime Distributed RTOS development setup running on separate platforms connected by Ethernet.
Note that the INtime for Windows and INtime Distributed RTOS development environments are identical except for the INtime Distributed RTOS having the Windows and the INtime components running on separate platforms connected via Ethernet. Because of those similarities it is possible to develop stand-alone INtime application with an INtime for Windows configuration setup and then move the application to target platform.
The procedure below describes installation of the INtime development tools and kernel on your development machine. Make sure that your development machine meets the requirements listed in the Platform Requirements section above.
Note: Install Visual Studio before installing INtime and insure that you are logged on with Administrator privileges. If you install Visual Studio after installing INtime, use the INtime Configuration Manager to add the INtime development tools to Visual Studio.
Insert the INtime CD-ROM. If AutoRun is enabled a welcome dialog appears. If AutoRun has been disabled you can start the installation procedure by double-clicking the file named launch.exe in the root directory of the INtime CD-ROM. The installation procedure is similar to that of most standard Windows applications. You will be asked to accept the INtime software license agreement and to supply one or more registration keys to complete the installation procedure.
A default destination folder of %PROGRAMFILES%\INtime (typically C:\Program Files\INtime) is suggested by the installation program for the INtime development tools and sample files. Make note of this directory so you can locate it again if you wish to inspect header files and other INtime system files. Sample projects will be installed in the user directory of the user who installed INtime. Configuration files will be installed in the %INTIMECFG% directory.
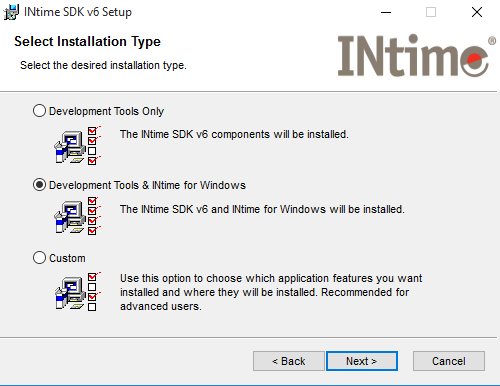
Two basic install options are provided:
Depending on the product you purchased, you may be prompted for a combined development license code (CMBL). This license codes can be found on the license card that came with your software.
If you are installing a network licensed product you will be prompted to enter the IP address or fully-qualified domain name of the license server. Contact your company’s IT personnel for the license server information you will need to complete this licensing step.
After installation has completed you will be asked to reboot the system. If you have been provided a hardware key, insert it before rebooting. Once the system has rebooted you have the option of configuring the INtime runtime environment and services.
The steps below describe the installation process to install INtime Distributed RTOS onto the target system.
The installation process assumes that the target system supports a CD drive and that the target system can be made to boot from the CD. Optional USB drive installation is also supported; it will require the target system to support booting from USB media.
IMPORTANT: Once the target system installation is complete, the target system will check for the appropriate license credential to run. You must then:
This optional step prepares a USB drive for installation of the INtime software on a target system. This method may be used if the CDROM medium is not available or if the software was delivered electronically. The USB drive will be formatted and the installation software installed on it.
At the prompt, enter the driver letter of your USB drive:
Enter USB Drive letter:
eg, d:
--
Press any key to continue ...
You can use this method to install from the product CD which also contains the SDK installer.
Prepare the target system to boot from the CDROM. Insert the CDROM media and boot the system.
On boot an automatic installation script will be invoked. It will ask a number of configuration questions and at each step you will be prompted to continue. If you choose not to continue, in general the previous step will be repeated.
The INtime SDK comes with a license to run the development tools and local INtime for Windows nodes, and one additional license to run an INtime Distributed RTOS target system for development purposes. The license for the INtime Distributed RTOS system is granted by the development system by a process called "tethering". A periodic check is made that the target is connected to a licensed development system, and if that check fails the target system will shut itself down.
To activate the tethering, start the tethering server on the development system. Open a command window and type "tetherserver". Start the target system you just installed and during the boot process you will see the message "System TETHERED" which indicates a valid connection has been made. If tethering fails the system will shut down after 10 minutes.
Once you have configured your tethering you can install the tether server as a Windows service like this:
tetherserver -install
If you wish your target system to run without being tethered you will need to obtain a runtime license and activate the system.